
With the fall colors coming in I have been in the mood for burnt yellows, and toasty orange accessories.
So I decided to make a diaper purse.
I bought this fantastic Travel bag at World Market at the beginning of the year.
I knew it's size would be perfect for a mother of three. And I was right.
It fits toys, books clothing, snacks and more.
I call it my Mary Poppins bag because it can see bottomless.
So there is the only problem, always finding what I am looking for.

Fortunately it is even big enough to fit another purse inside of it {or a child!}
SO that is where the idea to make a small diaper purse came from.
No more searching just grab and go.
Now when I need to leave our church meetings for diaper emergencies I can take the diapers while looking cute and still leave Jones with the goods for our other children.

First things first. I started with the bow.
I cut 2 pieces of vinyl 1 3/4"x 6 1/12" and straight stitch them together right sides can face out.

then I cut a small strip to wrap around the center of the bow {sorry I didn't measure}

Then I straight stitched the long edges.

Then I pinched the vinyl together in what is called an accordion pleat

And with a needle and thread hand stitched the middle band tightly in place.

Next I cut my Fabric.
I used 2 different fabrics one for a liner, and the other as the outer fabric.
Every piece was cut in both fabrics. *except the pocket

You need:
1- 12"x 2 1/2 strip for the strap {I made mine 3" and it feels a little too wide}
3- 10 1/2 x 6" pieces
2- 6 x 6
1- 10 1/2 x 10 1/2
1- 7 x 4 1/2 pocket

You will take the pocket and fold the edges down on 3 sides and straight stitch the edges.


Then take one of the Liner pieces that measures 10 1/2 x 6 and center the pocket on the bottom

Wrong side of pocket on right side of liner

Straight stitch only the 4in. sides

Then put the liner back together with the matching outer piece right sides together.
At this point all of the pieces should be pinned with their matching liner and outer piece right sides together
{right sides meaning the pretty side of the fabric}

Now you will want to straight stitch a 1/4" seam along 3 side of each piece, leaving one side open so that you can turn it right side out. As often as possible I left the bottom side open. * except for the 10 1/2 x 10 1/2 piece

Then clip the corners before turning them right side out.


After your pieces are right side out press all the seams and pin them together.
Outer fabric together.
I started with the bottom first

And then did the sides.

Now you can take the 10 1/2" x 10 1/2 " fold it in half and cut a curved edge on one side. Now straight stitch all along the sides and the curved edge. Not the bottom.
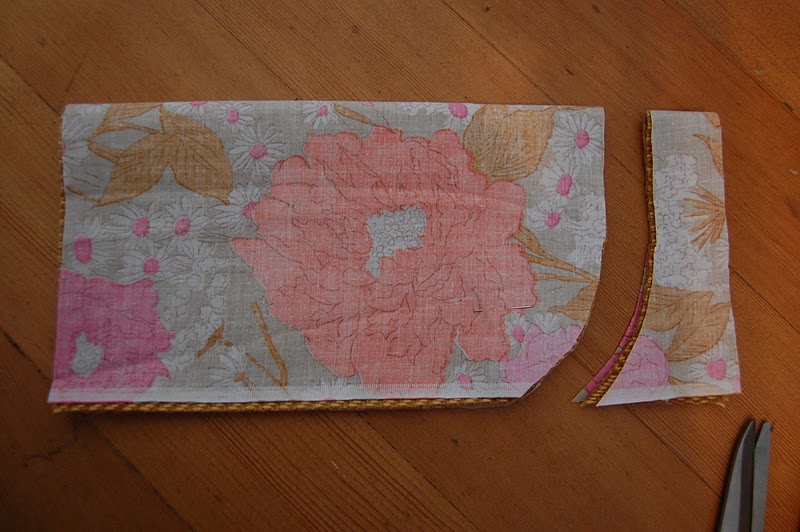
Clip the curved edges


*also forgot to mention that you may want to zig zag stitch the edges left open, if you did not do this before putting it together now would be the time to try.

Take the sides {6 x 6} and pinch them in half, while purse is inside out.
Pin and straight stitch the tops


Then add the top { curved piece} By first folding over the bottom edge outer side on outer side and zig zag stitch.

The while purse is still inside out place folded and zig zag stitched side to the pocket lined piece and straight stitch it on.

With the strap I straight stitched every edge an only left a 2 in space open to flip it right side out. I flipped int and then I folded an pinned the gap shut and did a straight stitch around the entire thing

Then I folded about 3/4" onto the under side of the top piece closest to the opening of the purse making sure the other side of the strap was lined up on the other side and stitched it on.


Then I pinched strap together and straight stitched it together at the bottom

Almost done!

Now all that is left it to add the bow and buttons. Center the bow at the bottom of the flap and straight stitch the ends on.
then I hand stitched the two buttons at either end.
Cut a 2" piece of elastic

put the ends together and cram it in the side seam of the purse and pinch the seam around it from the inside. Pin it securely in there, turn the purse inside out and stitch it in place.

And you are done!!
Add some diapers and wipes and you are good to go!

I added the pocket for keys or binkies, whatever you need!


Sure makes being a mom look cute.

In fact it is so darn cute I think I am going to make 2 more so Biscuit and Tober can carry around their girly toys.
:)


